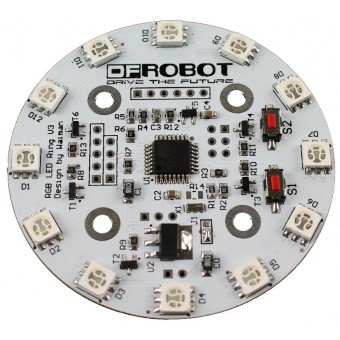
Nel precedente articolo dedicato al Rainbow LED Ring V3 Arduino hai visto come aggiungere la scheda all’IDE Arduino, tuttavia la scheda è stata realizzata quando la versione dell’IDE era la 0022
oggi la versione dell’IDE è la 1.0.3 e le librerie sono cambiate quindi vediamo quali modifiche devi eseguire per utilizzare gli esempi forniti con la Rainbow LED Ring V3 Arduino.
Negli esempi le modifiche sono eseguite con l’IDE Arduino 1.0 che utilizzo normalmente per i miei tutorial ma codice è identico per le versioni dell’IDE Arduino 1.0.1, 1.0.2 e 1.0.3.
Inizia scaricando gli esempi del Rainbow LED Ring V3 Arduino dal sito della DFRobot e decomprimendo il file .rar come descritto nell’articolo precedente.
Errore in compilazione delle librerie – Rainbow LED Ring V3 Arduino
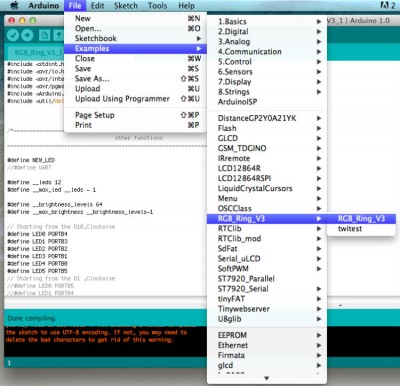
Per aprire l’esempio RGB_Ring_V3 del Rainbow LED Ring V3 Arduino esegui il percorso File > Examples > RGB_Ring_V3 > RGB_Ring_V3
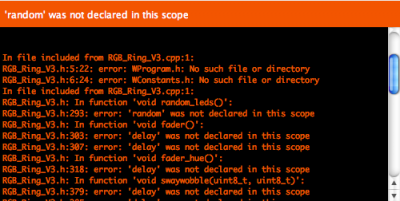
se provi a compilare l’esempio fornito ricevi l’errore:
che ho riportato anche nel precedente articolo:
In file included from RGB_Ring_V3.cpp:1:
RGB_Ring_V3.h:5:22: error: WProgram.h: No such file or directory
RGB_Ring_V3.h:6:24: error: WConstants.h: No such file or directory
In file included from RGB_Ring_V3.cpp:1:
RGB_Ring_V3.h: In function 'void random_leds()':
RGB_Ring_V3.h:293: error: 'random' was not declared in this scope
RGB_Ring_V3.h: In function 'void fader()':
RGB_Ring_V3.h:303: error: 'delay' was not declared in this scope
RGB_Ring_V3.h:307: error: 'delay' was not declared in this scope
RGB_Ring_V3.h: In function 'void fader_hue()':
RGB_Ring_V3.h:318: error: 'delay' was not declared in this scope
RGB_Ring_V3.h: In function 'void swaywobble(uint8_t, uint8_t)':
RGB_Ring_V3.h:379: error: 'delay' was not declared in this scope
RGB_Ring_V3.h:385: error: 'delay' was not declared in this scope
RGB_Ring_V3.h: In function 'void set_all_byte_hsv(uint8_t, uint16_t, uint8_t, uint8_t)':
RGB_Ring_V3.h:563: error: 'B00000001' was not declared in this scope
RGB_Ring_V3.cpp: In function 'void receiveEvent(int)':
RGB_Ring_V3.pde:-1: error: 'class TwoWire' has no member named 'receive'

As of Arduino 1.0, the Wire.receive() function was renamed to Wire.read() for consistency with other libraries.

RGB_Ring_V3.pde:-1: error: 'class TwoWire' has no member named 'receive'
il primo errore, come sai su Arduino devi leggere sempre l’errore più in alto per risolvere il problema alla fonte, è dovuto al cambio di alcune librerie di sistema fornite con l’IDE che non esistono dall’IDE 1.0 in poi, in particolare sono cambiate le due librerie:
#include <WProgram.h>
#include <WConstants.h>
dall’IDE 1.0 entrambe le librerie sono state sostituite dalla più moderna:
#include <Arduino.h>
che racchiude gran parte delle istruzioni, funzioni e metodi contenute nelle due precedenti.
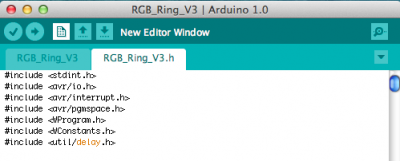
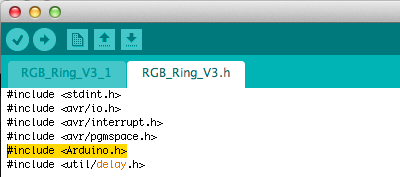
Ecco come eseguire la modifica, quando apri l’esempio RGB_Ring_V3 nella parte alta dell’IDE ci sono due TAB:
la prima contiene lo sketch di esempio fornito e la seconda la libreria necessaria a realizzare i giochi di luce sul Rainbow LED Ring V3 Arduino, seleziona la 2° TAB RGB_Ring_V3:
a questo punto tra le prime righe della libreria trovi tutte le librerie di sistema che a sua volta la libreria include, tra queste ci sono le librerie WProgram.h e WConstants.h:
sostituiscile con l’unica liberia Arduino.h:
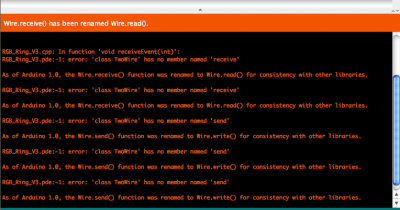
se provi a compilare il codice con questa modifica l’errore cambia, da un errore legato alle librerie incluse è diventato un errore legato ad alcuni metodi della classe Wire che hanno cambiato nome:
RGB_Ring_V3.cpp: In function 'void receiveEvent(int)':
RGB_Ring_V3.pde:-1: error: 'class TwoWire' has no member named 'receive'

As of Arduino 1.0, the Wire.receive() function was renamed to Wire.read() for consistency with other libraries.

RGB_Ring_V3.pde:-1: error: 'class TwoWire' has no member named 'receive'

As of Arduino 1.0, the Wire.receive() function was renamed to Wire.read() for consistency with other libraries.

RGB_Ring_V3.pde:-1: error: 'class TwoWire' has no member named 'send'

As of Arduino 1.0, the Wire.send() function was renamed to Wire.write() for consistency with other libraries.

RGB_Ring_V3.pde:-1: error: 'class TwoWire' has no member named 'send'

As of Arduino 1.0, the Wire.send() function was renamed to Wire.write() for consistency with other libraries.

RGB_Ring_V3.pde:-1: error: 'class TwoWire' has no member named 'send'

As of Arduino 1.0, the Wire.send() function was renamed to Wire.write() for consistency with other libraries.
per provare lo sketch è necessario solo eseguire alcune modifiche allo sketch come sostituire la chamata al metodo
wire.receive() con la chiamata wire.read()
e la chiamata
wire.send() con la chiamata wire.write()
Lo sketch di esempio Rainbow LED Ring V3 Arduino
di seguito trovi lo sketch con le modifiche eseguite che puoi compilare sul tuo IDE 1.0 o successivo e la libreria RGB_Ring_V3.h per il Rainbow LED Ring V3 Arduino.
Ecco lo sketch:
#include "RGB_Ring_V3.h"
#include <Wire.h>

int S1 = 3;
int S2 = 4;
int val1 = 0;     // variable to store the read value
int val2 = 0;
int turn = 0;

void setup() {
#ifdef UART
	InitUART();
#else
  Serial.begin(38400);           // start serial for output
#endif
	InitIO();

  Wire.begin(4);                // join i2c bus with address #4
  Wire.onReceive(receiveEvent); // register event

  pinMode(S1, INPUT);
  pinMode(S2, INPUT);
  digitalWrite(S1, HIGH);
  digitalWrite(S2, HIGH);
}

void loop() {
	uint8_t led;
  val1 =digitalRead(S1);
  val2 =digitalRead(S2);
  if(val1==LOW){  // ================演示代码
    uint16_t ctr;
    ALLLEDRED();
    delay(300);
    ALLLEDYELLO();
    delay(300);
    ALLLEDGREEN();
    delay(300);
    ALLLEDTURQUOISE();
    delay(300);
    ALLLEDBLUE();
    delay(300);
    ALLLEDFUCHSIA();
    delay(300);
    ALLLEDWHITE();
    delay(300);
    ALLLEDBLACK();
    delay(300);

    for (ctr = 0; ctr < 3; ctr++)    {
      sequence ();
    }
    ALLLEDBLACK();	// 测试单个LED
      set_led_rgb(0, 64, 0, 0);
      delay(100);
      set_led_rgb(1, 64, 32, 0);
      delay(100);
      set_led_rgb(2, 64, 64, 0);
      delay(100);
      set_led_rgb(3, 32, 64, 0);
      delay(100);
      set_led_rgb(4, 0, 64, 0);
      delay(100);
      set_led_rgb(5, 0, 64, 32);
      delay(100);
      set_led_rgb(6, 0, 64, 64);
      delay(100);
      set_led_rgb(7, 0, 32, 64);
      delay(100);
      set_led_rgb(8, 0, 0, 64);
      delay(100);
      set_led_rgb(9, 34, 0, 64);
      delay(100);
      set_led_rgb(10, 64, 0, 64);
      delay(100);
      set_led_rgb(11, 64, 0, 32);
      delay(100);
    for (ctr = 0; ctr < 24; ctr++)    {
      rotate(7,CW);
      delay(50);
    }

    ALLLEDBLACK();	// 测试滚动LED
    set_led_rgb(3, 64, 0, 64);
    for (ctr = 0; ctr < 60; ctr++)    {
      rotate(1,CW);
      rotate(3,CCW);
      delay(50);
    }
    ALLLEDBLACK();
    ALLLEDYELLO();
    delay(50);
    for (ctr = 0; ctr < 5; ctr++)    {
          swaywobble(50,CW);
    }
          ALLLEDBLACK();
          setwobble(0xFFFF);

    ALLLEDBLACK();
    for (ctr = 0; ctr < 3; ctr++)    {
      fader();
    }
          ALLLEDBLACK();
    for (ctr = 0; ctr < 3; ctr++)    {
      fader_hue ();
    }
          ALLLEDBLACK();
    for (ctr = 0; ctr < 400; ctr++) {
      color_wave (45);
    }
    for(ctr = 0; ctr < 5; ctr++) {
      disable_timer2_ovf();
      delay(100);
      enable_timer2_ovf();
      delay(100);
    }

	}else if(val2==LOW){	// ==============测试颜色代码
    switch (turn){
      case 1:
        ALLLEDRED();
        break;
      case 2:
        ALLLEDYELLO();
        break;
      case 3:
        ALLLEDGREEN();
        break;
      case 4:
        ALLLEDTURQUOISE();
        break;
      case 5:
        ALLLEDBLUE();
        break;
      case 6:
        ALLLEDFUCHSIA();
        break;
      case 7:
        ALLLEDWHITE();
        break;
      default:
        ALLLEDBLACK();
        break;
    }
    delay(200);
    turn++;
    if(turn==8) turn=0;

	}else{		// ================命令代码
		if(Command[0]>0XEF){
			if(Command[0]<0XFA){
                                setwobble(0X0FFF);
				switch (Command[0]){
					case 0xF0:
						if(Command[1]==1){
							enable_timer2_ovf();
						}else{
							disable_timer2_ovf();
						}
						Command[0]=0;
						break;

					case 0xF1:	//设置单个LED颜色
						set_led_rgb(Command[1], Command[2], Command[3], Command[4]);
						Command[0]=0;
						break;

					case 0xF2:	//设置单个LED单色
						set_led_unicolor(Command[1], Command[2], Command[3]);
						Command[0]=0;
						break;

					case 0xF3:	//设置全部LED同一颜色
						set_all_rgb(Command[1], Command[2], Command[3]);
						Command[0]=0;
						break;

					case 0xF4:	//设置全部LED同一单色
						set_all_unicolor(Command[1], Command[2]);
						Command[0]=0;
						break;

					case 0xF5:	//顺序转动单次
						rotate(Command[1], Command[2]);
						Command[0]=0;
						break;

					case 0xF6:	//设置亮度
						//
						Command[0]=0;
						break;

					case 0xF7:	//设置数组
						uint8_t w;
						for(w=0;w<__leds;w++)
							wobble_pattern_3[w]=(uint16_t)(Command[w*2+1]<<8|Command[w*2+2]);
						Command[0]=0;
						break;

					default:
						Command[0]=0;
						break;
				}
			}else{
				switch (Command[0]){
				case 0xFA:	//数组
					if(Command[1]>0){
						swaywobble(Command[1],Command[2]);
					}else{
                                                setwobble(0X0FFF);
						Command[1]=0;
						Command[0]=0;
					}
					break;

				case 0xFB:	// 暴闪
                    if(Command[1]>0){
    					disable_timer2_ovf();
    					delay(Command[1]);
    					enable_timer2_ovf();
    					delay(Command[1]);
                    }else{
						enable_timer2_ovf();
						Command[1]=0;
						Command[0]=0;
					}
					break;

				case 0xFC:	// 滚动
					if(Command[1]>0){
						rotate(RED, Command[2]);
						rotate(GREEN, Command[3]);
						rotate(BLUE, Command[4]);
						delay(Command[1]);
					}else{
						Command[1]=0;
						Command[0]=0;
					}
					break;

				default:
					Command[1]=0;
					Command[0]=0;
					break;
				}
			}
		}
	}
}

void receiveEvent(int howMany)
{
  uint8_t data;
  Serial.println("I received: ");
  ReceivePtr=0;
  while(1 < Wire.available()) // loop through all but the last
  {
    data = Wire.read();
    Serial.println(data, HEX);
    rx_buf[ReceivePtr]=data; // receive byte as a character
    ReceivePtr++;
    if(ReceivePtr==RX_MASK)  ReceivePtr=0;
  }
    data = Wire.read();
    Serial.println(data, HEX);
    if(rx_buf[0]==0xF8){
        uint8_t l=rx_buf[1];
        Wire.write(brightness[0][l]);
        Wire.write(brightness[1][l]);
        Wire.write(brightness[2][l]);
    }
    if((ReceivePtr<=COMMAND_SIZE) && (rx_buf[0]==data)) savebuff();

}
Inizia dalle linee 001 e 002 in cui includi la libreria RGB_Ring_V3.h e la Wire.h;
linee 004-005: definisci due variabili S1 ed S2 a cui sono connessi i rispettivi pulsanti presenti sul circuito;
linee 006-008: definisci alcuni variabili di tipo integer in cui memorizare dei valori di stato durante l’esecuzione dello script;
linee 011-016: inizializza i metodi di comunicazione: UART con il metodo InitUART() della Libreria RGB_Ring_V3.h o attraverso la comunicazione su porta Seriale a 38400 baud e infine InitIO() con cui imposti in automatico le uscite HIGH e LOW ed alcuni timer di setup del Rainbow LED Ring V3 Arduino ( puoi leggere come funziona il metodo InitIO() nella RGB_Ring_V3.h )
linee 18-19: utilizza due metodi della classe Wire per indicare che il pin 4 sarà utilizzato per la comunicazione I2C e per registrare la funzione receiveEvent alla ricezione di un evento, a funzione la trovi definita alle linee 251-274;
linee 021-024: definisci la modalità di funzionamento dei pin S1 ed S2 e inizializza ad HIGH entrambi i pin;
Tralascio le linee di codice necessarie ai giochi programmati nell’esempio per descriverti i comandi che poi potrai utilizzare nel tuo sketch per accendere i led del Rainbow LED Ring V3 Arduino:
linea 054: trovi la funzione set_leg_rgb( led_number, R,G,B ) a cui puoi impartire l’ordine di accendere un led dell’anello del colore che preferisci inviando il codice colore attraverso i valori di R,G e B che variano da 0 a 64 dove 64 è il valore di massima luminosità del volore.
Warning!
Se sei abituato a lavorare con i led ed Arduino sai che i valori in PWM vanno da 0 a 255 per cui dovrai adattare il valore al nuovo range 0-64.
Per adattare il valore puoi utilizzare la classica proporzione in cui
255 : 64 = X : VAL -> X = ( 255 * VAL ) / 64
in cui X è il valore in 64esimi e VAL è il valore PWM che avresi inviato al led, in alternativa puoi usare la funzione map() di Arduino che hai visto da me utilizzata in altri tutorial:
map( variabile, min, max, newmin, newmax )
linee 056-077: esegui l’impostazione colore per ciascuno dei led presenti sul Rainbow LED Ring V3 Arduino;
linea 079: incontri la funzione rotate( color, dir ) con cui puoi far ruotare un colore sui 12 led semplicemente impartendo un colore ed una direzione. Nella documentazione ufficiale è riportato:
ROTATE(COLOR, DIR)
This function will rotate 1 specific color for the LED ring to CW or CCW direction. The color variable is set from 0 – 7 (or you can use color enumerator, RED, GREED, BLUE, YELLOW, TURQUOISE, FUCHSIA, WHITE and BLACK. The dir variable is set from 0 – 2 (or the direction enumerator CW and CCW).
Da cui puoi ricavare che il colore in questa accezione deve essere inviato con un numero da 0 a 7 corrispondente alla sequenza di colori
- rosso = 0
- verde = 1
- bleu = 2
- giallo = 3
- turchese = 4
- fuchsia = 5
- bianco = 6
- nero = 7
e la direzione puoi impartirla sia con i valori CW ( orario ) CCW ( antiorario );
linea 101: la funzione fader() ti permette di accendere un led passando da 0 alla sua intensità massima ( 64 ) e viceversa;
linea 105: la funzione fader_hue() ti permette di far passare i led da Rosso a Verde, da Verde a Bleu e da Bleu a Rosso in sequenza, dopo la sua esecuzione il led resta acceso sul rosso;
linea 174: trovi la funzione set_all_rgb( R, G, B ) con cui imposti lo stesso colore per tutti LED del Rainbow LED Ring V3 Arduino, il colore lo definisci con il range 0-64 per ciascuno canale R,G e B;
linea 179: la funzione set_all_unicolor( rgb, int ) con cui puoi impostare lo stesso colore per tutti led e cambiare l’intensità contemporaneamente, il primo parametro può variare da 0 a 2 corrispondente a rosso (0), verde (1) e blue (2) e l’intensità puoi variarla da 0 a 64;
Il video esempio Rainbow LED Ring V3 Arduino
Buon divertimento !!!





 Il blog mauroalfieri.it ed i suoi contenuti sono distribuiti con Licenza
6 commenti
1 ping
Vai al modulo dei commenti
Fatte le stesse procedure,
ma con arduino leonardo non riesco a farlo funzionare purtroppo, provando con qualunque opzione contenente la voce optiboot mi compila ma non invia a Leonardo oppure invia ma non funziona.
Selezionando leonardo come dispositivo (non presente nella lista optiboot) non trova in compilazione le porte pbX/pcX/pdX/csX/TCCR2B/WGM etc, vedendo il file .h di leonardo molte voci sono state commentate per “// Workaround for wrong definitions in “iom32u4.h”. // This should be fixed in the AVR toolchain.” Ho provato prendendo queste costanti da un iom32u4 aggiornato online ma le ultime tre non esistenti (le altre le ho trovate nella versione aggiornata online) sono:
RGB_Ring_V3.h:241: error: ‘PC1’ was not declared in this scope
RGB_Ring_V3.h:241: error: ‘PC0’ was not declared in this scope
RGB_Ring_V3.h:241: error: ‘PC2’ was not declared in this scope
che purtroppo nel file iom32u4.h non esistono, ci sono solo queste
#define PORTC _SFR_IO8(0x08)
#define PORTC6 6
#define PORTC7 7
Inoltre facendo riferimento alla connessione quella mostrata in figura e guardando le costanti S1 e S2 facendo riferimento al pinout di arduino, non corrispondono alle porte digitali invece che analogiche?
int S1 = 3;
int S2 = 4;
3: PD1 – PCINT17, TXD [PIN1]
4: PD2 – PCINT18, INT0 [PIN2]
Qualche suggrimento? Grazie
Autore
Ciao Neogene,
purtroppo la Leonardo non ha la possibilità di rimuovere il microcontrollore Atmega328, non avendolo, ed ha un unico chip che si occupa sia della comunicazione con il Pc sia di caricare ed eseguire lo sketch al suo interno.
Per questo motivo penso non sia possibile usarla per programmare la RGB Ring, dovresti provare nella modalità ISP descritta sul sito DFRobot, io personalmente non ho mai provato.
Mauro
Hello – excuse the english.
have you been able to reliably use the other pins on the Rainbow LED ring? for example, attaching sensors?
Autore
Hi Casey,
do not worry, my english is worse.
no, I have not tried it yet, I want to try in the next few days 🙂
Mauro
Thank you thank you, Thank You, THANK YOU!
I bought one of these boards recently and was struggling for about a week to convert the supplied code to IDE 1.0.5. For some STUPID reason I was trying to convert it to a LIBRARY, with separate .cpp and .h files, and was struggling with what should be in each, it didn’t seem to follow the usual C++ rules and was complaining about duplicate references and stuff. I was close to pulling my hair out, then I found your page, and your approach is MUCH better 🙂
I see you use “LilyPad ATmega168” board settings? I found I needed one with .upload.speed=115200 in boards.txt, and rather than mixing up 2 versions of boards.txt I ended up writing my own:
rgbring.name=DFRobot RGB Ring
rgbring.upload.protocol=arduino
rgbring.upload.maximum_size=14336
rgbring.upload.speed=115200
rgbring.bootloader.low_fuses=0xe2
# … or 0xe2 0xff
rgbring.bootloader.high_fuses=0xdd
rgbring.bootloader.extended_fuses=0x00
# … or 0x02 0x00 ?
rgbring.bootloader.path=optiboot
rgbring.bootloader.file=optiboot_atmega168.hex
rgbring.bootloader.unlock_bits=0x3F
rgbring.bootloader.lock_bits=0x0F
rgbring.build.mcu=atmega168
rgbring.build.f_cpu=8000000L
rgbring.build.core=arduino
rgbring.build.variant=standard
My kids are covinced the example code now runs FASTER than the original though, and I think they are right.
Any advice on the correct _fuses settings?
Thanks again! I needed this for a Halloween party TONIGHT and was convinced I was never going to get it going 🙂
Autore
Hello NoseyNick,
you can find in this article: https://www.mauroalfieri.it/en/elettronica/rainbow-led-ring-v3-arduino.html
references to the file board.txt issued by the manufacturer of the shield.
Tell me how it goes 🙂
[…] introduttivo alla Rainbow LED Ring V3 Arduino – IDE 1.0 hai letto come utilizzare la tua arduino uno R3 per programmare la Rainbow Ring V3, e nel wiki […]